Upgrade Measures Information
BERWOW provides the Irish homeowner with innovative online tools to explore, plan and implement energy upgrades of their homes. You can learn about the various measures below.
Floor Insulation
Many houses built right up to the 1970s were built with suspended timber floors. Such floors offer little thermal resistance as they are directly above a vented void. Cold air may leak between the floorboards into the dwelling above.
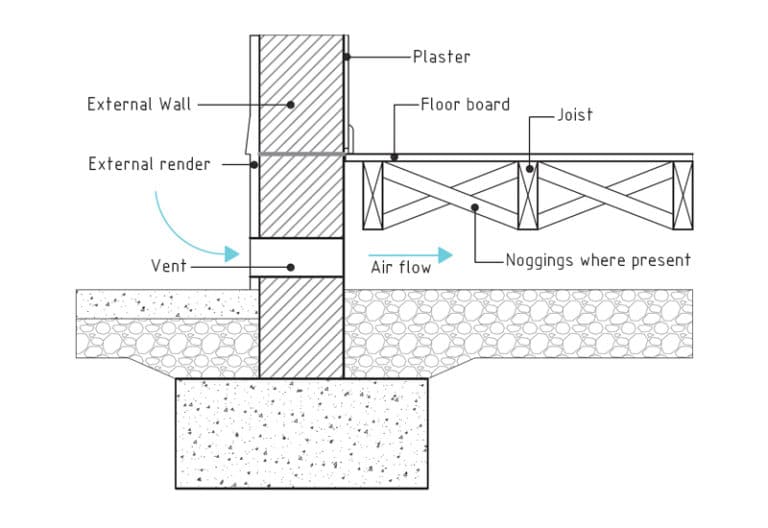
Image 1.1: Suspended timber floor
Source: NSAI S.R. 54, Code of Practice for energy efficiency Retrofit of dwellings (reproduced with permission of NSAI)
Where floorboards can be lifted, underfloor insulation in the form of mineral fibre, spray form or rigid insulation boards can be installed providing insulation and eliminating draughts. If underfloor heating is being considered, consideration could be given to a complete replacement with a solid floor construction.
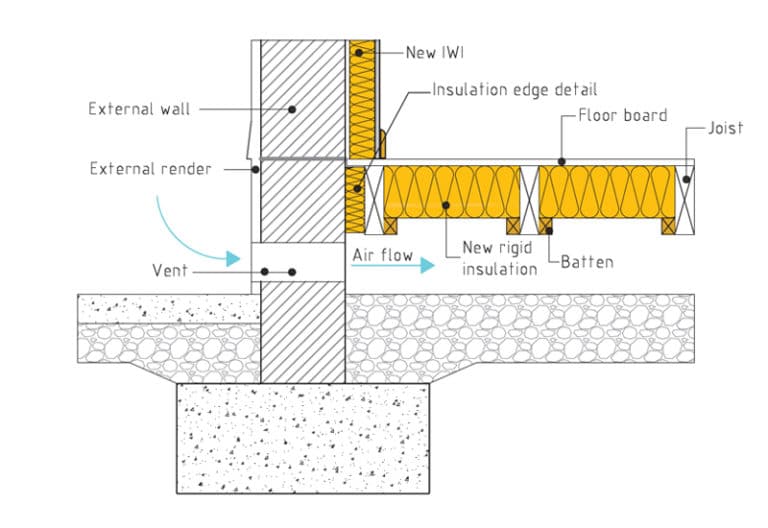
Image 1.2: Underfloor insulation with rigid board shown with IWI
Source: NSAI S.R. 54, Code of Practice for energy efficiency Retrofit of dwellings (reproduced with permission of NSAI)
Typically refers to where a front door is recessed from the building line meaning the small section of bedroom floor above is exposed to the open air. Best practice would be to insulate this small section of exposed floor to reduce heat loss in the room above and to eliminate cold spots.
Bedrooms situated above unheated garages are classed as semi-exposed floors. These floors should also be insulated where possible to reduce heat loss from the first floor room.
It can also refer to where a first floor room is situated above a drive through passageway.
In all cases, if no insulation is in place, fixing rigid insulation boards to the underside of exposed or semi-exposed floors is the recommended upgrade measure.
Wall Insulation
External insulation is the best way to insulate your exposed single leaf solid walls. Assumed U value = 0.27 W/m2K. For some solid walls such as stone or brick built prior to 1950, it may not be appropriate to install the amount of insulation recommended here. Seek professional advice for the right insulation solution.
Houses built using 9 inch (225mm) solid block walls, 9 inch (225mm) hollow block walls or mass concrete walls have a single leaf wall construction. Where these walls are not insulated or are poorly insulated, either external or internal wall insulation can be considered. External wall insulation is recommended where there are no issues with boundary walls or potential issues with traditional brick finishes.
External Wall Insulation (EWI) involves fixing insulating materials such as mineral wool or expanded polystyrene slabs to the outer surface of the wall. The insulation is then covered with a special render to provide weather resistance. A variety of finishes can be applied ranging from acrylic paint, pebble dash and brick cladding. A steel or fibreglass mesh is embedded in this render to provide strength and impact resistance.
External insulation systems can also solve additional problems (other than poor levels of insulation) suffered by some homes such as rain penetration, poor air-tightness or frost damage. This is also an excellent opportunity to give your home a new look.
Homeowners availing of wall insulation grants under the SEAI Better Energy Homes are required to install wall insulation which should achieve a U-value of 0.27 W/m2K or better (i.e. lower). The external insulation product installed must be NSAI (National Standard Authority of Ireland) Agrément certified.
All works should be done in accordance with S.R.54 the Code of practice for energy efficiency retrofit of dwellings published by NSAI (National Standard Authority of Ireland).
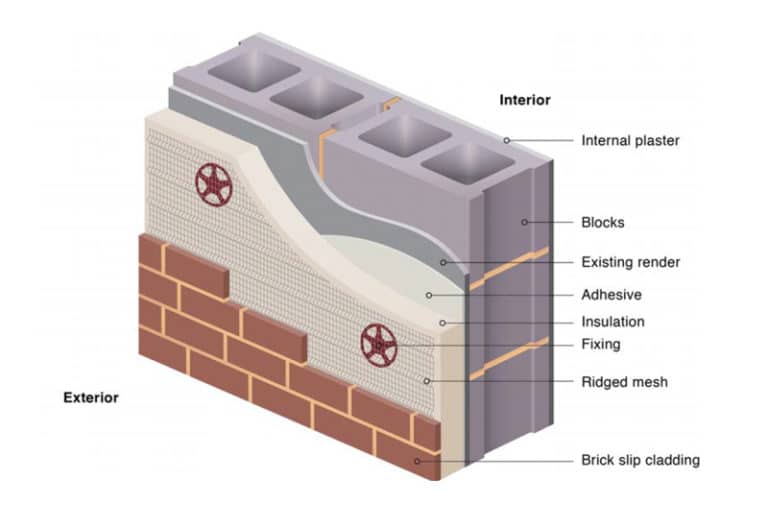
Image 2.1: Sketch of external wall insulation system (typical dry system)
Source: NSAI S.R. 54, Code of Practice for energy efficiency Retrofit of dwellings (reproduced with permission of NSAI)
Internal insulation (sometimes referred to as ‘dry-lining’) involves fixing insulation to the inner surfaces of your exposed single leaf solid walls. Assumed U value = 0.27 W/m2K. For some solid walls such as stone or brick built prior to 1950, it may not be appropriate to install the amount of insulation recommended here. Seek professional advice for the right insulation solution.
Internal wall insulation (IWI) is an alternative to external wall insulation for dwellings built using 9 inch (225mm) solid block walls, 9 inch (225mm) hollow block walls or mass concrete walls of single leaf wall construction. IWI may be selected if the owner wishes to retain the external facades, where there are space/ boundary wall issues or if part of the dwelling walls have already been partly insulated.
This usually involves fixing an insulation board to the walls and covering it with a vapour barrier layer and plasterboard. One of the main disadvantages of internal insulation is the loss of room space and the need to re-decorate rooms after the insulation works are completed; this may be minimized by using high performance insulation products that are thinner.
While internal wall insulation is often a more affordable option than installing external wall insulation, the loss or space and potential necessity to take out and re-fit kitchens and appliances can result in people choosing the external insulation option.
S.R.54 The Retrofit code of Practice for energy efficiency Retrofit of dwellings published by NSAI (National Standard Authority of Ireland) provides detailed advice on optimising the wall insulation solutions and how to avoid issues relating to moisture ingress, dampness and interstitial condensation with different wall types. Your contractor will advise on the most appropriate solution.
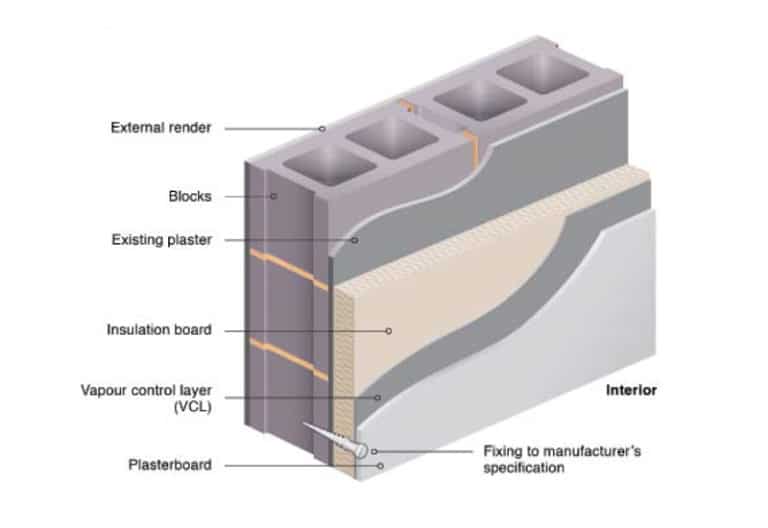
Image 2.2: Sketch of internal wall insulation system (thermal laminated board fixed to internal face of wall)
Source: NSAI S.R. 54, Code of Practice for energy efficiency Retrofit of dwellings (reproduced with permission of NSAI)
A cavity wall consists of two rows of bricks or concrete block with a cavity or space between them. The empty or part-filled cavity can be pumped with insulation beads by drilling holes in the mortar joint of the external walls. Assumed U value = 0.35 W/m2K.
A cavity wall consists of two rows of bricks or concrete block with a cavity or space between them. If a house was built before the mid 1980’s and has cavity walls, it is possible that the cavity may not contain any insulation.
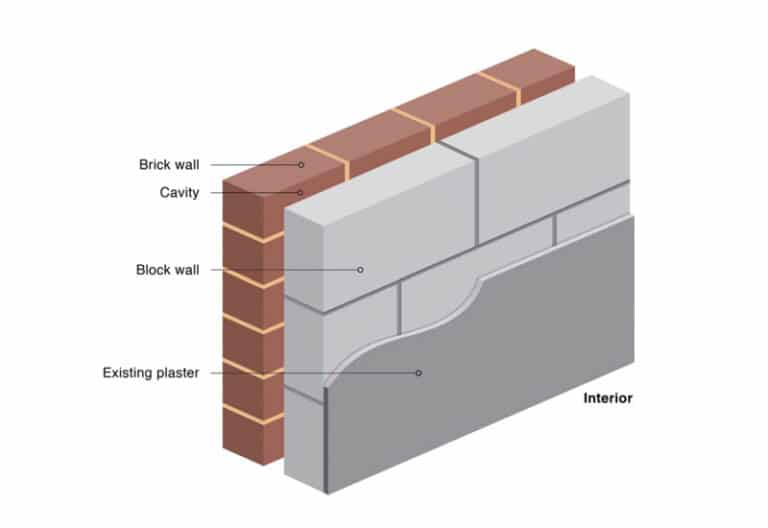
Image 2.3: Sketch of unfilled / clear cavity wall
Source: NSAI S.R. 54, Code of Practice for energy efficiency Retrofit of dwellings (reproduced with permission of NSAI)
Injection of insulating product from the outside is the best method for insulating this type of wall. Cavity wall is cheaper than both internal or external wall insulation. In some cases, cavity wall insulation can be combined with either internal or external wall insulation.
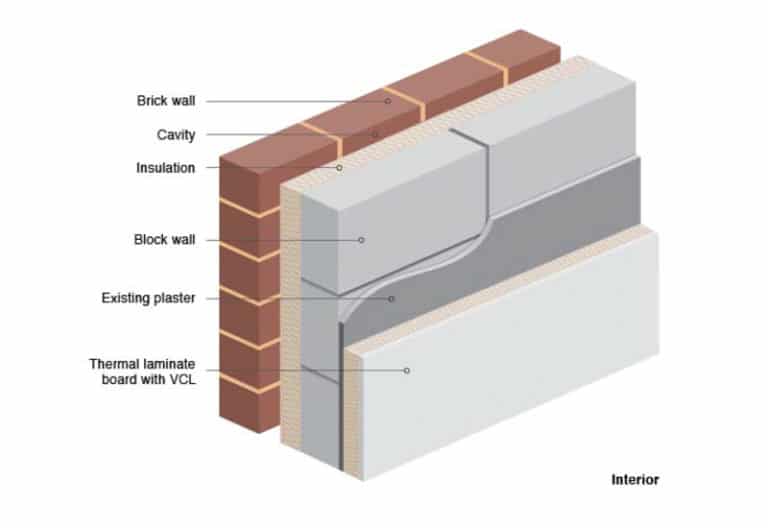
Image 2.4: Sketch of cavity wall insulation system (partial fill cavity with IWI top up)
Source: NSAI S.R. 54, Code of Practice for energy efficiency Retrofit of dwellings (reproduced with permission of NSAI)
Timber frame walls are uncommon in older Irish dwellings apart from short wall sections in attic conversions or rooflight shafts. If an older house has timber frame walls, it should not be externally insulated or cavity-filled.
Timber frame walls are uncommon in older Irish dwellings apart from short wall sections in attic conversions or rooflight shafts. If an older house has timber frame walls, it should not be externally insulated or cavity-filled. So the options are to replace the insulation between the studwork, and/or to fit insulation to the internal face.
Generally BERWOW will call up timber frame wall insulation measures if there is an attic room with poorly insulated walls or if the rooflight shafts are not insulated. The four sides of the shaft walls are losing heat into the roof space so they should be fitted with rigid insulation board between and across the timber studs.
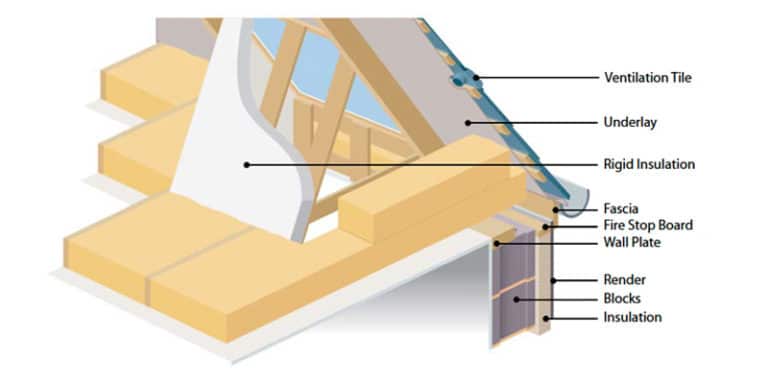
Image 2.5: Sketch of timber-frame wall insulation system (insulated light shaft)
Source: NSAI S.R. 54, Code of Practice for energy efficiency Retrofit of dwellings (reproduced with permission of NSAI)
Roof Insulation
Adding insulation rolls to the roof space of a house to achieve a minimum total insulation depth of 300mm should be the first step when deciding to insulate.
A cold pitched roof is typically an empty attic space that may be used as a store for items such as suitcases and Christmas decorations. Older dwellings may have no insulation at all in the attic space or perhaps 50mm or 100mm of mineral fibre between the horizontal joists at ceiling level.
Insulating such attic spaces is typically done by placing sufficient insulation rolls at ceiling level between the horizontal joists. It is important to cross-lay a second insulation layer to prevent air movement at edges of the insulation and to achieve a minimum total insulation depth of 300mm in line with NSAI certification and the Retrofit Code of Practice. Lagging of all pipework, fitting of cold water tank jackets and insulation and draught-proofing of the hatch door should be included.
Sections can be floored above the insulation as required to provide storage space. Correct insulation of pipework and the water storage tank would be recommended best practice along with insulation and draught-proofing of the loft hatch. Ventilation of the roof space would also need to assessed and addressed as required.
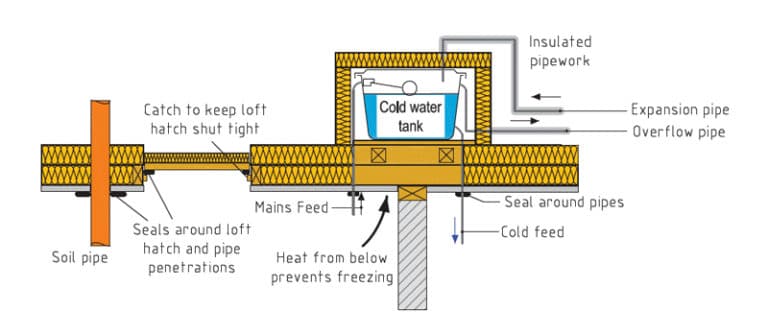
Image 3.1: Insulating water tanks and sealing penetrations to roof
Source: NSAI S.R. 54, Code of Practice for energy efficiency Retrofit of dwellings (reproduced with permission of NSAI)
Rafter level insulation is placed in the slopes of the roof and is common where rooms exist in the roof space. It may also arise where some sections of the main roof have short rafter level sections to the front and rear of the dwelling or where a ground floor or first floor room has been designed open to the pitch of the roof.
Rigid insulation boards can be placed either in between or below the rafters (or both) with a ventilated void between the rafters above the insulation with high level (ridge) ventilation. (See ventilation route blue arrows in Image 3.2).
The insulation should be continuous and at no point should it prevent cross ventilation of the roof voids. Note that rigid insulation boards typically have twice the thermal performance of fibre/ wool products.
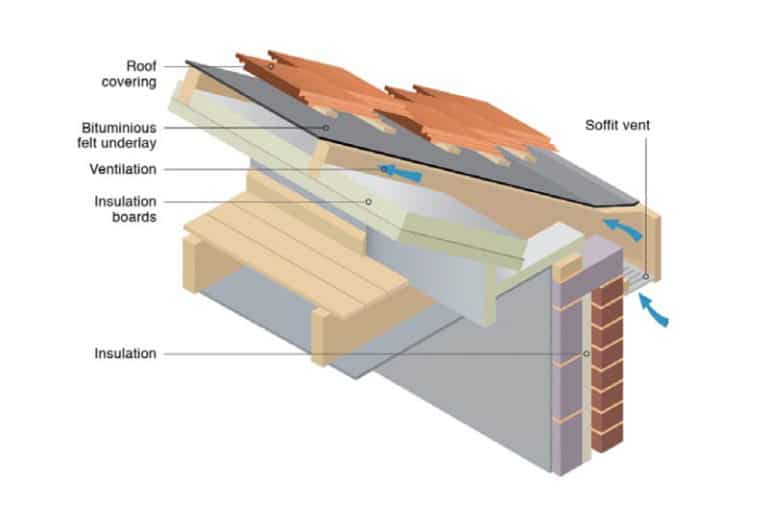
Image 3.2: The use of high performance insulation between and below rafters
Source: NSAI S.R. 54, Code of Practice for energy efficiency Retrofit of dwellings (reproduced with permission of NSAI)
Insulation can be added to older flat roofs that have either no insulation or minimal levels of insulation. The existing roof structure will need to professionally assessed to determine whether the additional insulation should be placed on the underside of the roof at ceiling level or on top of the existing roof.
Flat roof insulation can be retrofitted in a variety of ways. Image 3.3 shows this type of roof can be insulated by adding high performance insulated laminated plasterboard to the underside of the existing ceiling. It is vital that adequate cross-ventilation is achieved without any blockages or restrictions.
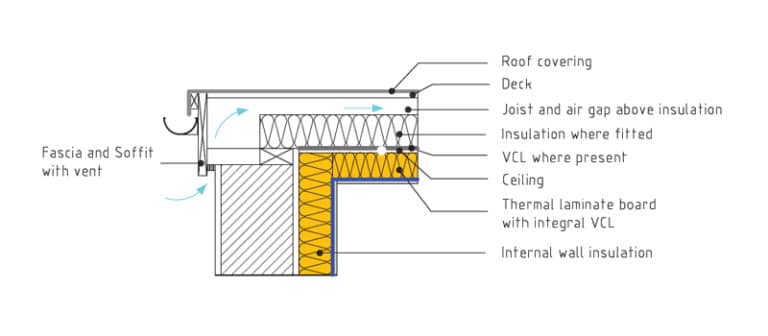
Image 3.3: Cold roof upgrade with thermal laminate board, carried out internally
Source: NSAI S.R. 54, Code of Practice for energy efficiency Retrofit of dwellings (reproduced with permission of NSAI)
Where the insulation is on the top of a flat roof structure along with a new weather-proof roof covering, this is known as a warm flat roof as shown in Image 3.4. The existing roof structure will need to be assessed by a qualified professional to determine the optimum solution.
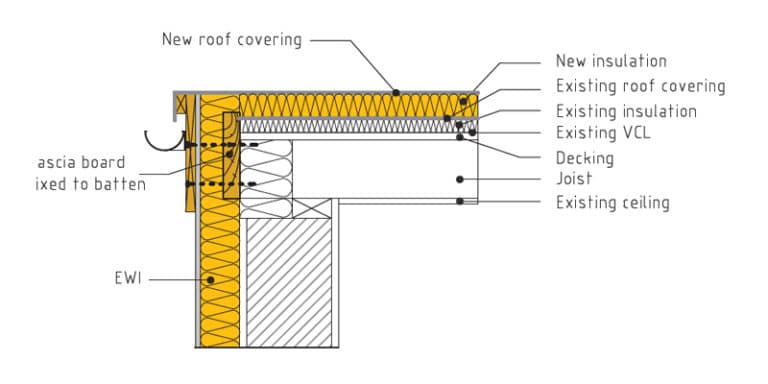
Image 3.4: Warm deck roof with new additional insulation over existing and external wall insulation
Source: NSAI S.R. 54, Code of Practice for energy efficiency Retrofit of dwellings (reproduced with permission of NSAI)
Rooms-in-roof or converted attics need to be well-insulated to avoid cod in winter and over-heating in summer. All surfaces should be insulated including the short stud/ knee walls, the sloped roof section, any top roof sections and all hatch doors should be insulated and draught-proofed.
A typical insulation solution for room in roof is shown in Image 3.5.
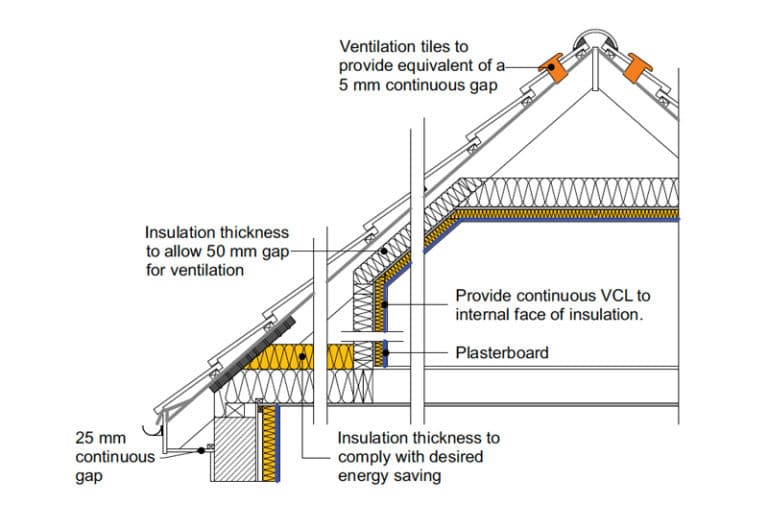
Image 3.5: Ventilation required for a room in the roof space
Source: NSAI S.R. 54, Code of Practice for energy efficiency Retrofit of dwellings (reproduced with permission of NSAI)
For optimum heat loss performance, it is vital that all heat loss surfaces to outside and to the unused roof space/ storage areas are well insulated. Note that the unused roof space will be required to be well ventilated and so it can get very cold in winter. Thus, it is important that the entire structure is airtight. Quite often flimsy uninsulated hatch doors that are not draught-stripped prove to be the weak spots.
Windows
New doors and windows will address the poorer thermal performance of existing units, will eliminate draughts, reduce external noise and help retain incoming solar energy.
When sourcing new doors or windows, try to ensure your supplier can provide you with independent test certificates issued by an accredited body. This will be important in ensuring the performance of your new windows and doors can be correctly reflected in any future BER calculations.
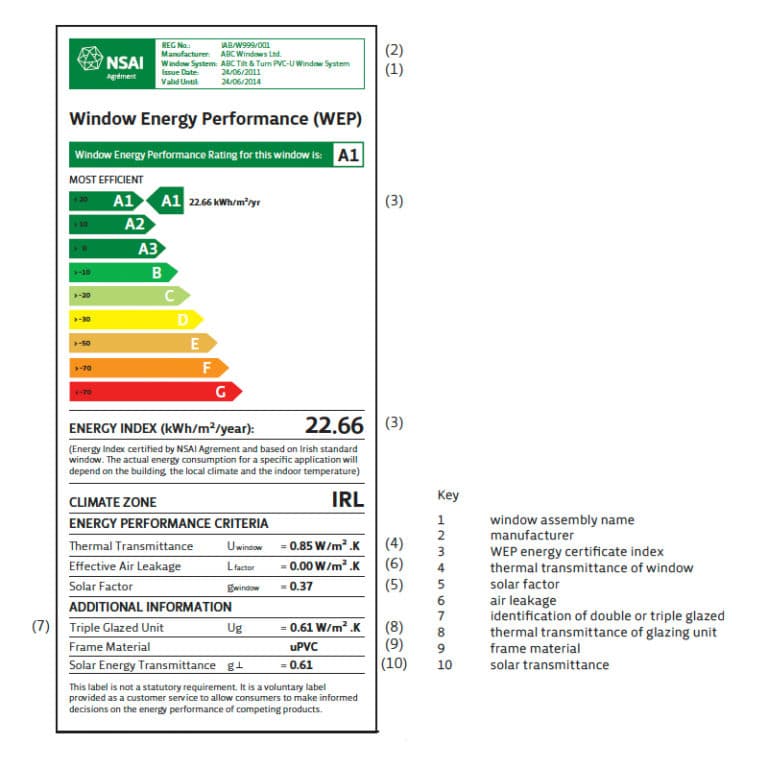
Image 4.1: Window energy performance label
Source: NSAI S.R. 54, Code of Practice for energy efficiency Retrofit of dwellings (reproduced with permission of NSAI)
Heating Systems
A heat pump is a renewable technology that uses electricity to provide both space heating and hot water. They work best with well-insulated homes, either new homes or older homes that have added higher specification insulation. Homes built from 2005 onwards are generally “heat pump ready”.
The most common type of heat pump is an air-to-water heat pump. An air-to-water heat pump contains a liquid that absorbs a large volume of low-temperature heat obtained from the outside air, compresses it into a smaller volume of higher temperature heat and transfers it into the water in our radiators or underfloor heating systems and hot water cylinders. Other heat pump types can also absorb heat from the ground or from water (streams, rivers etc) and transfer the heat indoors.
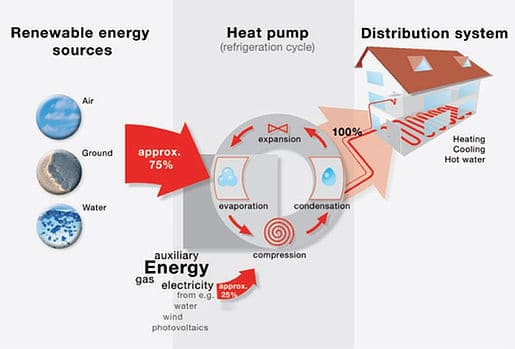
Image 5.1: Heat pump technology and application
Source: The Heat Pump Association of Ireland (reproduced with permission of HPA)
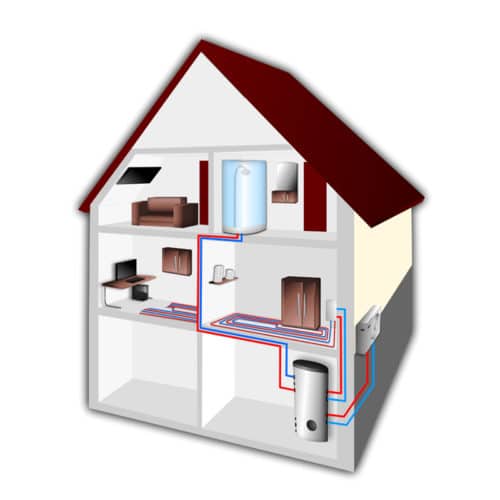
Image 5.2: Air source heat pump (air-to-water heat pump)
A heat pump works best in a well-insulated home and is not suited to a poorly insulated home.
SEAI provides grant support totalling €3,500 for heat pump installations but the grant is contingent on proving that the rate of heat loss in the home is not too high. This rate of heat loss is called the heat loss indicator (HLI) and it is calculated within the BER assessment.
SEAI requires that the heat loss indicator (HLI) value for the home, which relates to heat loss through floors, walls, windows, roofs and ventilation openings must be less than 2 Watts/m2/K. This HLI value of 2 would be typical for a home built in accordance with the 2005 Building Regulations. So, all older homes will generally need additional insulation measures to be heat pump ready.
SEAI requires that the HLI calculation be conducted by a registered Technical Advisors as part of the grant application process. Available Technical Advisors (who would also be BER assessors) are listed on SEAI’s website.
A heat pump’s efficiency is often referred to as a Coefficient of Performance (COP). The COP describes the ratio of electrical power used to heating power produced under fixed input and output conditions by the heat pump unit only. A COP is used for examining the performance of a heat pump unit at ideal test conditions, usually in a laboratory.
A COP of 4 means for every 1kW of electrical energy used, 4kW of useful energy is produced – a net 3kW of useful energy will be ‘free’ generated by the heat pump. The COP decreases with falling ambient air temperatures and rising flow temperatures.
The Seasonal Performance Factor (SPF) or Seasonal Coefficient of Performance (SCOP) indicates a heat pump’s performance over a full heating season.
SPF values may be in the range of 350% to 450% for space heating. Heat pumps can supply heat to either radiator systems or underfloor heating systems or a combination of both. Where an air-to-water heat pump feeds an underfloor heating system, this can result in SPFs over 500% as the heat pump can work better with lower (water) flow temperatures.
We can also use low temperature radiators, aluminium or steel panel or fan coils which require flow temperatures up to 55 °C, resulting in SPF’s around 400%.
The hot water production efficiency though for any heat pump it is not that high due to the high flow temperature required to heat water. This figure is in around the 200% mark and takes into account that most air-to-water heat pumps require an electrical immersion element to raise the temperature in the tank to 60 °C, as anti-legionella protection.
Note that the best gas boilers are 91% efficient and the best oil boilers are 97% efficient.
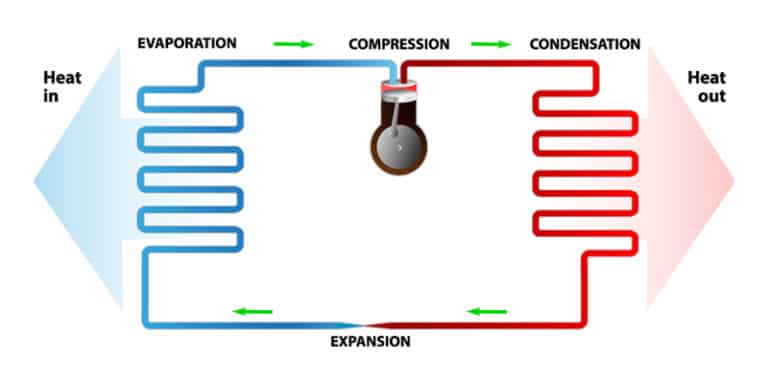
Image 5.3: How does a heat pump work
Modern heating controls will enable you to separate your hot water and radiator circuits and set on and off times independently. You will use less fuel and save money.
Many Irish homes have poor heating controls with no options to separately set temperatures and on-off periods for space or water heating either in the home or remotely by smartphone apps such as Climate. Smart heating controls provide you with both local and App access to control your home heating, meaning you always come home to a warm home.
Good heating controls will give you the option to heat your hot water from your boiler during the summer months, without having to turn off the radiators and possibly unbalance your system.
The heating controls package subdivides the home into independently controlled space heating and water heating zones, motorized controlled valves must be installed, along with at least one room thermostat and or thermostatic radiator valves (TRVs), a hot water cylinder thermostat (if required) and a 7-day programmable timer. The cylinder and room thermostats can then operate to create a boiler interlock to ensure your boiler only operates when required.
It is also wise to ensure your heating controls can be operated remotely so you can switch the heating on before coming in from work or while waiting for your luggage in the airport!
Boilers that are over 10 years old may lose up to 40% of the fuel you burn through emissions from the boiler’s exhaust or flue. Modern condensing boilers are 90% plus efficient and will reduce your energy consumption and fuel bills.
Condensing boilers replacements will give optimal performance if accompanied by:
- A chemical flush to increase the efficiency of your heating system
- A magnaclean magnetic filter to protect and extend the operational life of the boiler
- An endotherm additive solution to allow your radiators to heat up quicker and stay hotter longer
- Smart heating controls to operate your heating remotely from your smartphone
Modern heating controls will enable you to separate your hot water and radiator circuits and set on and off times independently. When you combine a new boiler with modern heating controls, you will even use less fuel and save money.
Ventilation Upgrades
DCV is a whole-house ventilation system ideally suited to retrofit projects. It combines humidistat-based vents in bedrooms and living rooms with mechanical extract vents in wet rooms to give a regulated air change regime.
Demand control ventilation (DCV) provides a smart whole-house ventilation system. DCV avoids the need for extensive ductwork associated with mechanical heat recovery ventilation (MHRV) systems.
DCV works using humidistat-based vents in bedrooms and living rooms. These vents have a clever material strip that expands and opens the vents wider when humidity levels are higher and contracts and thus closes the vent again when humidity levels are returned to normal. These inlet vents have no mechanical or electrical parts.
DCV uses extract grilles to take air away from wet rooms like kitchens and bathrooms in ducts connected to a central point. A central fan exhausts unwanted air out of the building.
Both the inlets and the extract grilles react to indoor air quality (IAQ) and thus adjust the rate of airflow; the fan detects these changes in pressure, which means there are no cables or controls needed, and adjusts its running speed accordingly. The fan is typically very quiet (about the same as a PC) and uses minimal electricity (about the same as a low energy light bulb). It does not require filter changes or regular servicing.
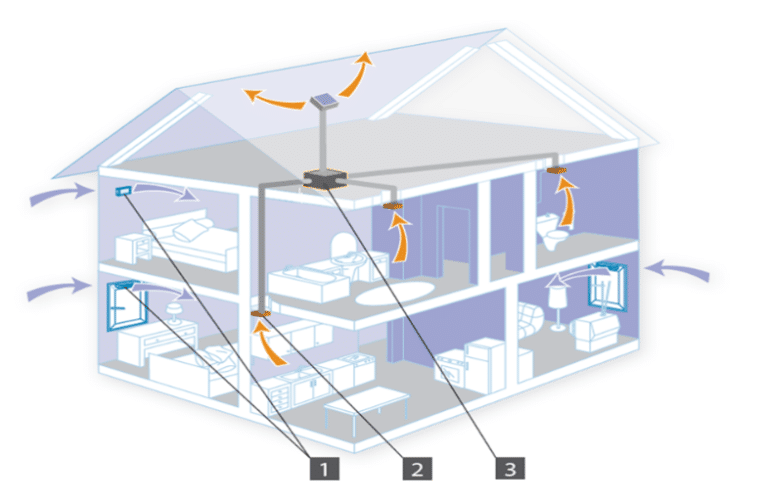
2. Extract grilles - take air from wet rooms
3. Fan - exhausts air from the building
Image 6.1: Demand control ventilation system
Source: Aereco Ireland (reproduced with permission of Aereco)
MHRV is whole house ventilation system that extracts stale moist air from the dwelling at a constant rate. It recovers heat from extracted air and uses it to pre-warm the replacement fresh air from outside.
The proportion of heat recovered by the MHRV heat recovery process is known as the unit’s “heat exchange efficiency”.
The heat recovery unit reduces the amount of energy required from the space heating system. This is counter balanced by the electrical energy needed to run the fan.
These systems work best in well insulated and airtight dwellings. An air tightness target should be set as part of any retrofit works that can be checked via an air tightness test.
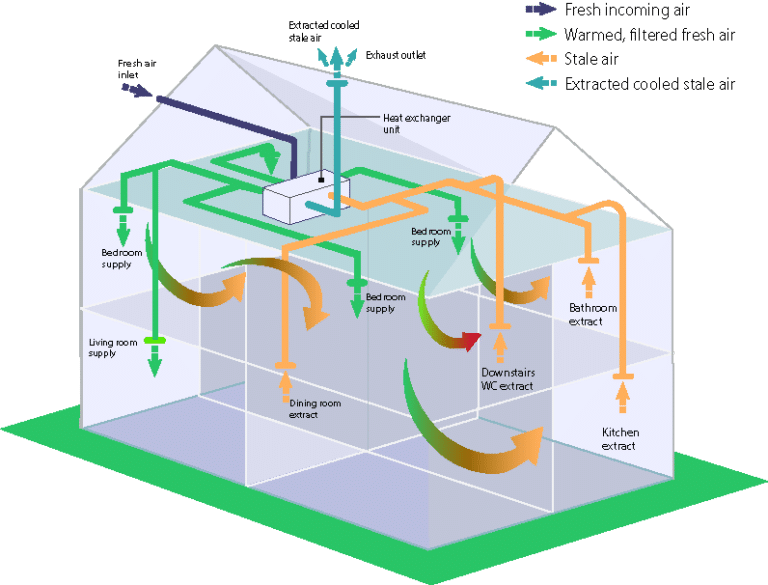
Image 6.2: A typical heat recovery ventilation system layout
Many existing homes are draughty due to unwanted air gaps in the dwelling. An air tightness package involves installing sealing tapes at key junctions and draught-proofing where required.
Sealing up a chimney that is no longer in use will prevent it from being a major air leakage path.
Sealing of the chimney should be done according to the Code of Practice for Retrofit S.R. 54:2014&A1:2019 – see Image 6.3 below.
The chimney should be sealed:
- Within the room; and
- At the ceiling level of any insulated roof to ensure that the chimney breast within a heated room doe not contain cold air. This should prevent the potential for both surface and interstitial condensation on or within the chimney.
Above the level of the insulated ceiling the chimney should be:
- Ventilated from within the roof space to the outside of the dwelling
- Capped to prevent ingress of moisture or rain whilst maintaining ventilation
Alternatively, ventilation of the flue should be maintained by a vent in the sealed fireplace. Where the chimney is on an outside wall, the internal face should be insulated.
Any alterations to flues should be performed by a suitably qualified person.
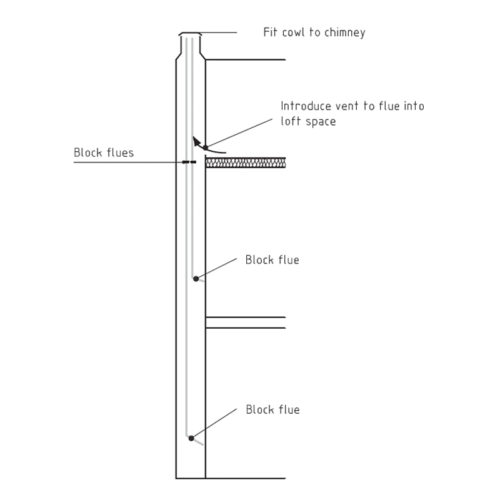
Image 6.3: Sealing of chimney flues no longer in use
Source: NSAI S.R. 54, Code of Practice for energy efficiency Retrofit of dwellings (reproduced with permission of NSAI)
Solar
Solar photovoltaic panels (PV for short) generate electricity from direct sunlight and natural daylight. The electricity generated is then fed via an inverter into the home’s distribution board where it can be used for different purposes in the home.
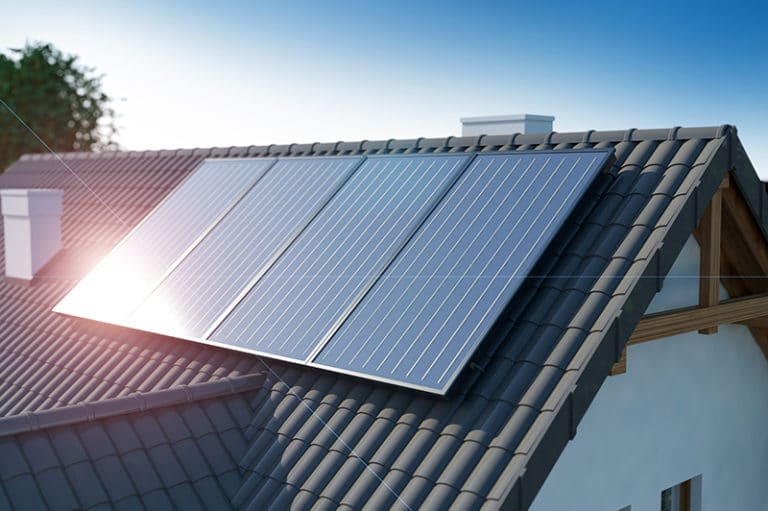
Image 7.1: Solar PV panels on roof of a detached house
As well as supplying electricity for normal household devices, PV-generated electricity can also be used to supply heat pumps, electric car batteries and also can be diverted to electric immersions in hot water tanks. Electric vehicle chargers, such as Zappi, can be connected to your Solar PV panels to charge your EV. New battery technologies will also enable some of the electricity generated to be stored.
A typical PV panel measures 1m x 1.7m and has a peak output of circa 300W , though this varies depending on the models installed. It is important that the number of PV panels and thus the power generated in Watts matches the base/ minimum electrical load of the house.
It is expected that a feed-in tariff for the export of electricity generated in homes to the ESB network will be introduced during 2021. There is no indication yet as to the tariff levels, but it unlikely to be set at a level where a homeowner would profit from exporting electricity.
Solar thermal panels capture heat from the sun and use it to heat the hot water water cylinder. In Ireland, solar thermal panels meet 50% of a home’s hot water needs.
Solar thermal is normally used in conjunction with a conventional gas or oil boiler as shown in Image 7.2 from SR54. Evacuated tube or flat plate collectors may be used. They absorb the incident solar radiation, which is transferred to the domestic hot water supply through a water circuit and second coil in the hot water cylinder.
Solar water heating can provide most of the average dwellings’ domestic hot water requirement in the summer.
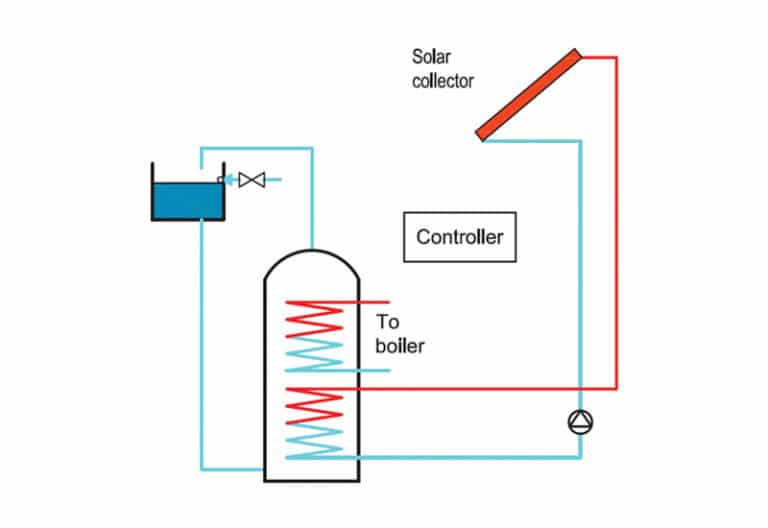
Image 7.2: Typical schematic of a solar water heating system for connection to a boiler
Source: NSAI S.R. 54, Code of Practice for energy efficiency Retrofit of dwellings (reproduced with permission of NSAI)
